
Want a smaller, younger, and sharper face? This guide unlocks the secrets of contouring for ALL face shapes! ✨ Highlight, shade, and transform your look in minutes. Let’s get sculpting!
Makeup Goals
- Even skin tone for a flawless complexion
- Create a three-dimensional look for a spirited and elegant appearance
- Anti-aging for a youthful look
Key Points for Makeup Application
After the age of 30, we are more prone to problems such as sunken foreheads, apple cheeks, temples, prominent cheekbones, sunken cheeks, shrinking chins, dark circles, and sunken nasolabial folds. When applying makeup, it is important to fill in the sunken areas.
Why is Contouring the First Step?
Contouring is the most basic step in all makeup applications. You need to understand the contours of your face so that you can clearly know how to contour, highlight your strengths, and avoid your weaknesses to create the best face shape.
Only after understanding contouring can you better understand how to apply foundation, so learning contouring is a must-have lesson in makeup!
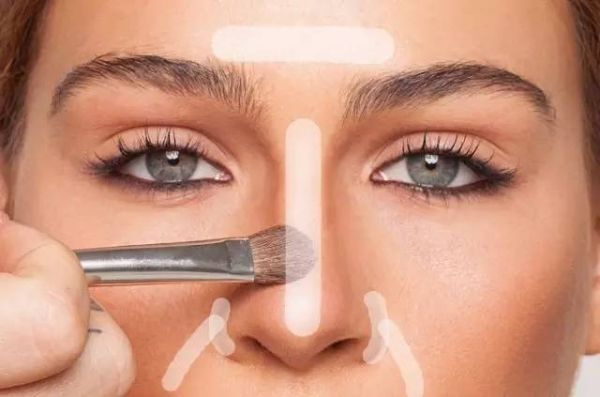
Highlighter
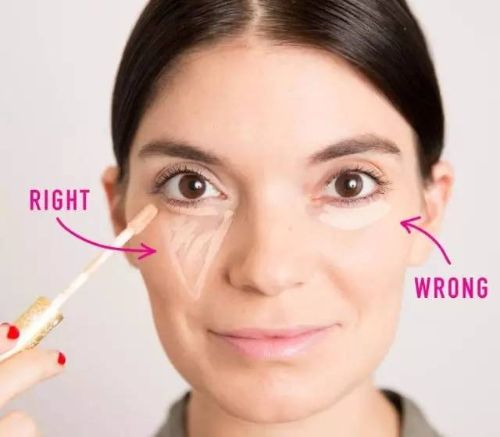
The area below the eyes, extending no further than the front corner of the eye, no further than the back corner of the eye, and no further than the base of the nose. This is the apple cheek area, which should be plumped up with highlighter.
The temples, forehead, chin, cheeks, and nasolabial folds are also areas that should be filled with highlighter.
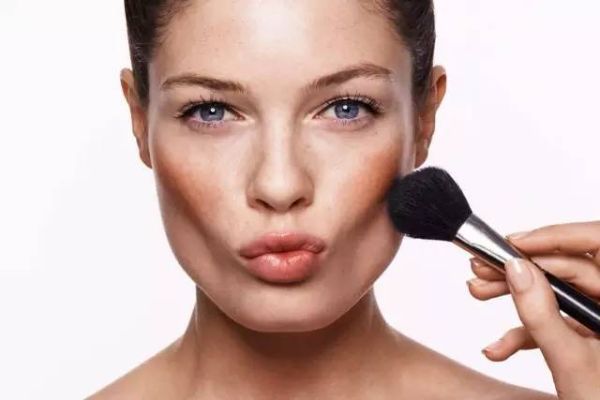
Shade
High cheekbones can make you look mature and fierce. Apply shadow from the upper edge of the sunken area in the picture to the cheekbones (not to the triangular area under the eyes) for immediate results, making your face look smaller (with a shrinking feeling), younger, and this is the little trick of shadow.
Highlighter and Shadow for a Perfect Profile
The side profile of a beautiful woman follows the principle of four highs and three lows.
- Highlighter (four high) areas:
Forehead high, nose tip high, lip beads, chin high, all need highlighters; such a side arc is a symbol of a woman’s youth and beauty. - Shadow (three lows):
The junction of the forehead and nose is low, which makes the forehead look plump and the nose look straight;
then the middle of the philtrum should be low, which will make the nose and lips look more three-dimensional;
finally, the lip bed is low, draw shadows under the lip bed, which makes the side look especially good.
How to Contour for Different Face Shapes?
If your index finger connects your chin and nose without touching your lips, you are a “standard beauty”.
The purpose of contouring is also to infinitely approach the standard face shape, which is close to the oval face shape.
No matter what face shape we have, don’t worry, I will teach you how to contour for different face shapes next.
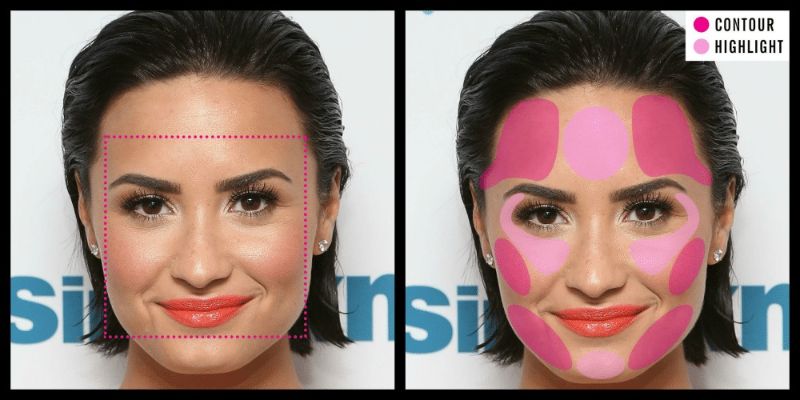
The shadow area and highlight area of each face shape are different:
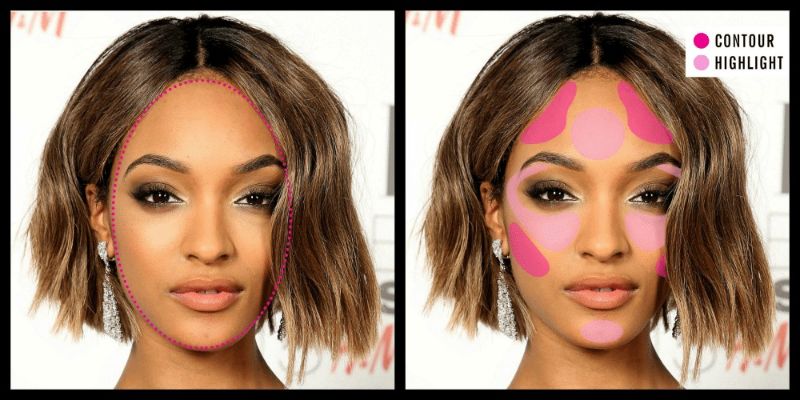
1. Square Face
As shown in the picture above, the area outside the oval is the shadow area. When applying side shadow, you should blend naturally.
The highlight area of the forehead should be lengthened to have the effect of lengthening the face shape, which is closer to the oval face shape.
As shown in the right picture, this is a typical wrong practice, which will make the face look more square.
2. Round Face
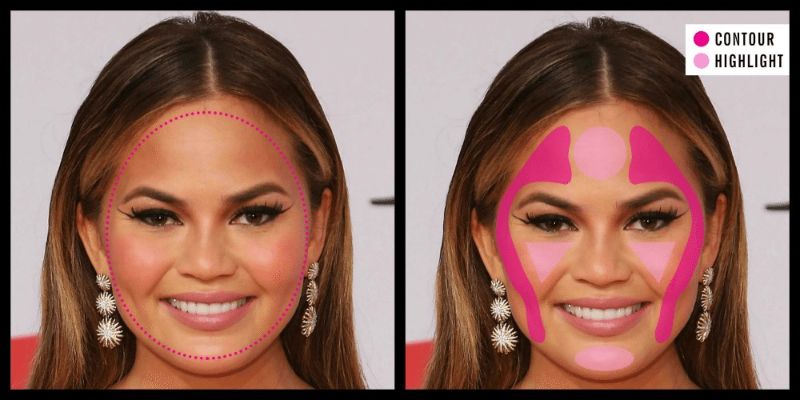
Apply side shadow on both sides of the face to modify according to your own face shape.
The disadvantage of a round face is that it lacks a sense of fashion, and the advantage is that the whole face is full of collagen. The forehead and chin can be lengthened with highlighters, which will further highlight the advantages of a round face.
Apply highlighter to the cheekbones and shadow below the cheekbones to make the face look smaller and thus modify the face shape to make it more three-dimensional.
3. Long Face

Contour from the forehead down and from the chin up, no need to contour on both sides, blend naturally, and don’t make too obvious marks.
The forehead and chin do not need to have highlighters, highlighters will lengthen the face shape, highlighters should be applied to the apple muscles for horizontal highlighting to widen the face.
4. Diamond Face
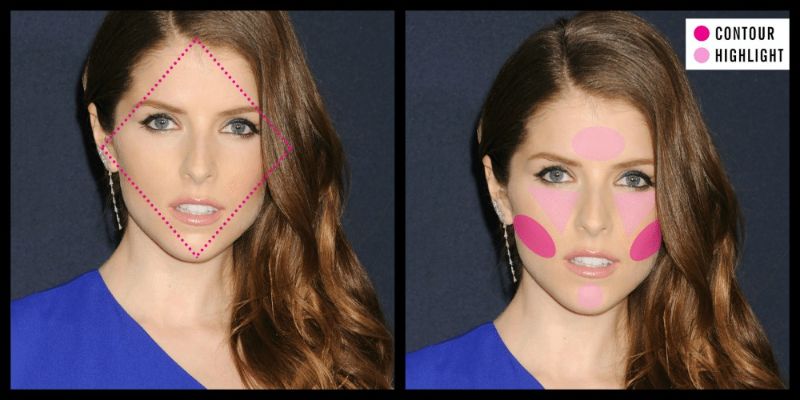
The cheekbones of a diamond face are relatively high and the temples are sunken, so use shadow to modify the cheekbones, which will naturally balance the sunkenness of the temples.
The highlighter is just the regular area shown in the picture, which will make the face shape tend to be oval.
5. Heart-shaped Face

The heart-shaped face is the closest to the perfect face shape and basically does not need facial modification. If some sunken areas appear due to age, they can be modified with highlighters.
6. Oval Face
The oval face, considered the ideal shape, requires minimal contouring to enhance its natural features. Apply bronzer along the outer contours, blending upwards for a natural look.
Highlight the forehead’s center, bridge of the nose, chin, and Cupid’s bow for a lifted appearance. Add a touch of highlighter to the cheekbones for a subtle glow.
The Recap
By contouring, we create both an outer and inner definition:
- Outer definition: All face shapes are contoured with highlighter and shadow to create a shape closer to an oval face, making the face appear smaller and more three-dimensional.
- Inner definition: The highlighter area can effectively enhance the inner definition, making us look younger!
Only by mastering advanced contouring techniques can you create a solid foundation for a perfect makeup look.
Further Reading:
Chinese Retro Makeup: 6 Steps Tutorial with Images
French Makeup: 5 Steps Tutorial with Images
Japanese & Korean Makeup: 6 Steps Tutorial with Images
How to Choose the Best Hair Length for Your Vibe?
Skincare 101: Unveiling Aging Process & Science-based Solution